How to Make Decorated Garden Focaccia

Garden focaccia is the prettiest bread you'll ever see. Learn how to make this delicious and Instagram-worthy bread at home.
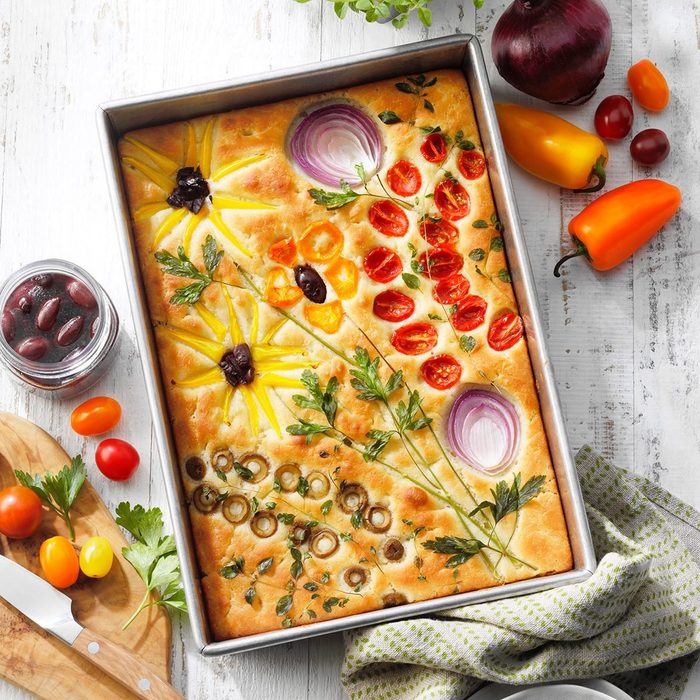
Everyone loves a freshly baked loaf of bread—especially when that bread is a tender, flavour-filled pan of focaccia. The only thing that could make this bake better is when it gets transformed into a piece of bread art. Sometimes called garden focaccia, this is a soft loaf that gets topped with all the best and brightest herbs and veggies.
And nope, you don’t need to be an artist to turn bread into a canvas. All you need to do is pick a few herbs from the garden and grab few veggies up at the farmers market. You’ll find this no-knead bread is a snap to put together and no matter how you arrange your produce on top, it’ll be a showstopper.
(Related: How to Choose a Healthy Bread)
How to Make Garden Focaccia Bread
This focaccia recipe comes to us from Taste of Home‘s deputy editor, James Schend. He explains that this bread is so easy to make: “It’s one of the least labor-intensive breads since there isn’t any kneading.” The result yields a tender yet chewy bread—one that’s also perfect for layering with veggie decorations.
Ingredients
- 1 packet (1/4 ounce) active dry yeast
- 1-1/4 cups warm water, divided
- 1 tablespoon honey
- 3 cups all-purpose flour
- 1/4 cup plus 3 tablespoons olive oil, divided
- 3/4 teaspoon salt
- 1 teaspoon flaky sea salt (optional)
- Veggies and herbs to decorate
Test Kitchen-Recommended Tools
One of the joys of this recipe—besides it being absolutely gorgeous—is that it doesn’t require a lot of special tools. You’ll need the kitchen basics.
- Liquid measuring cup: Use this to measure the olive oil and proof the yeast.
- Mixing bowl: To mix up bread dough, you’ll want an oversized bowl. This set of glass bowls is great for prep and mixing.
- Metal 13×9 pan: For this recipe, our Test Kitchen recommends using a metal baking pan. This pan will heat up quickly to give the focaccia a nice crust on the bottom.
(Related: Joanna Gaines’ 3 Minute Bread Recipe Will Change How You Bake)
Directions
Step 1: Proof the Yeast
This decorated focaccia starts the same way any yeasted bread recipe does: with proofing yeast.
Proofing yeast activates this microorganism and gets it ready to use in your bread. To do this, dissolve a packet of yeast in a half-cup of warm water (about 100-110ºF) mixed with a tablespoon of honey.
Stir and let this mix stand for five minutes or until it looks frothy. That’s how you know the yeast is alive and ready to be added into the mix. If it doesn’t bubble, start over and make sure your water isn’t too hot.
Editor’s tip: If you don’t have honey in your cupboard, a tablespoon of sugar will work just fine.
Step 2: Make the Dough
In a large mixing bowl, add the flour, 1/4 cup olive oil, salt, water and yeast mixture and stir until smooth. You can use your stand mixer if you like, but this dough will come together easily mixing by hand. In fact, this is the perfect time to break out your dough whisk—just one of our favorite bread-baking tools.
Unlike more traditional loaves, focaccia dough is a bit wet, so don’t be concerned if the dough is a little sticky.
Step 3: Proof
When your dough is well mixed, scrape down the sides of the bowl, cover and let the dough rise until it doubles in size. This should take about 45 minutes.
Step 4: Prep Your Baking Pan
While the bread proofs, prep your baking pan. Brush a 13×9 pan—our test kitchen used a metal pan here—with a tablespoon of olive oil.
The oil will keep the bread from sticking, but it also adds more flavour. Focaccia is all about the olive oil, so be sure you’re using the good stuff.
Step 5: Press the Dough into the Pan
When your pan is prepped, gently scrape the focaccia dough into the pan. Oil your hands and spread dough so it covers the bottom of the pan.
If you find that the dough springs back and doesn’t want to stretch to every corner, let it rest there for 10 minutes and try again. Sometimes the dough just needs to rest a bit longer until it’s pliable enough for this step.
Step 6: Add Dimples and Proof Again
After stretching the dough, make indentations using your fingertips. These divots will catch all the oil and gives focaccia its signature appearance.
When pressing into the dough, push until you feel the bottom of the pan (but don’t break through the dough to the pan itself). You want these dimples deep to catch the olive oil—they will become much shallower after proofing and baking.
Step 7: Decorate
If you want to keep this focaccia simple, just sprinkle with flaky sea salt. Our Test Kitchen likes the generously sized flakes in a box of Maldon sea salt.
But we know you don’t want to keep it simple! Now is the time to head out to your garden and see what fresh veggies are growing. Use cherry tomatoes, peppers and fresh herbs to decorate the top of the bread. You can even use a few items from the fridge like olives.
Step 8: Proof Again
After you’ve decorated, let the bread proof again. This time just for 30 to 40 minutes.
Step 9: Bake
Bake the focaccia in a 425ºF oven for 20 to 25 minutes. The bread should look golden brown.
This bread is best served warm, so slice into it right away! And if you can’t finish it in one go, it will keep for a few days on the counter; just keep it wrapped up or in an airtight container. You can freeze bread, too.
(Related: 9 Healthy Sandwich Recipes to Pep Up Lunch Time)
What Vegetables and Herbs Work Best for Garden Focaccia?
The Taste of Home Test Kitchen experimented a lot with this decorated focaccia bread. After baking up several pans, our pros discovered that some veggies and herbs worked better than others when it came to decoration.
Here are the veggies and herbs that worked:
- Fresh tomatoes: Grape and cherry tomatoes work especially well for garden focaccia. Slices of larger tomatoes may give off a bit too much moisture, so stick with smaller varieties. And remember: Cherry tomatoes come in lots of colours, so make use of the rainbow!
- Olives: Our Test Kitchen loved the taste of olives with this focaccia recipe. Use these carefully in your decorating because some types of olives can get a bit shriveled. But that slight withering will not affect the taste.
- Oregano: Oregano adds wonderful Italian flavour and bakes up perfectly on top of this bread.
- Parsely: If you want beautiful leafy greens in your design, this is the fresh herb to reach for. Go for Italian or flat-leaf parsley over the curly option.
- Peppers: Peppers of all kinds are a favorite in our Test Kitchen for decorating this garden focaccia. Use bell peppers, snacking peppers or jalapeños. Any way you slice them (really, slice them any way), they make for gorgeous designs.
- Red onion: You can add a touch of purple to your decorated bread with red onion. It will lighten up a bit in the baking process but still remains pretty and delicious.
These are the veggies to avoid when decorating focaccia:
- Red cabbage: This veggie didn’t hold onto its colour or flavour. If you want purple hues to decorate your garden focaccia, go with red onion instead.
- Rosemary: This herb had a tendency to burn while baking. If you want to add some rosemary flavour to your bread, add chopped, fresh rosemary leaves to the dough. Dried rosemary also works.
- Sun-dried tomatoes: These tomatoes had a tendency to burn around the edges. Stick with fresh tomatoes to decorate.
- Thyme: Just like with rosemary, fresh thyme sprigs burned up in the oven. Add some of this herb to the bread dough to get the most thyme flavour.


