The cheapest workout tool you’ll ever use
 Updated: Jul. 16, 2019
Want to build strong, shapely muscles? Tone up with our custom workout, featuring the cheapest workout tool ever: tubing!
Tone up with tubing
Re-energize your workouts and tone your body with a time-tested tool that encourages “cross-training” your muscles: resistance tubing. While weights generally rely on gravity to be effective, tubing goes beyond this. “It offers ?resistance in countless directions and angles, versus weights that you only lift up and down,” says Mark Vendramini, a certified personal trainer and co-owner of Bootcamp University in Toronto. He finds that moving muscles in all directions helps reduce repeated stress injuries.
The toning benefit? Challenging your muscles in new ways makes them stronger and fitter. Studies show that tubing can improve balance and strengthen your muscles, and it is a very user-friendly form of exercise. As well, tubing is inexpensive and wonderfully portable. Tuck it into an overnight bag for weekend getaways (did we mention it’s lightweight?), or stash it in a desk drawer for a quick lunchtime workout. Here’s a top-to-bottom routine that will yield stronger, more-toned muscles.
Getting started
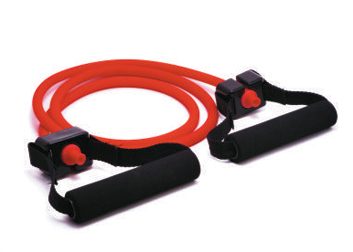
Equipment: You’ll need sturdy fitness shoes and resistance tubing with handles (for added comfort). Tubing usually comes in several colour-coded intensity levels, but colours vary among manufacturers. Your best bet: Size up intensity by thickness (the thinner the tubing, the easier it is to pull). Average price: $10 to $15. (You can also use a resistance band. They’re wide and flat, a little easier to pull, and usually don’t have handles. But overall, the two are pretty much interchangeable.)
Warm-up: March in place or walk briskly for three minutes, then do 20 to 25 gentle squats and eight to 10 bent-leg pushups.
How often: Three times a week, do two sets of each of these exercises. Total time for this routine is approximately 15 to 18 minutes (includes five minutes for stretching at the end).
1. Side-step squat
Works: outer thighs, hips and glutes
A. Stand with feet hip-width apart and the tubing under the middle of your shoes. Grip the tubing’s handles and lift them to shoulder height, elbows tucked in close to your body, palms facing in.
B. (Shown) Keeping wrists straight, step your right foot a little to the right until your feet are slightly wider than hip-width apart. Do a squat.
C. Stand up and return right foot to the starting position. Alternate right and left sides for 30 reps. (For more intensity, do 15 reps on one side, then repeat on the opposite side).

2. Wide-grip seated rows
Works: core, back of shoulders, and mid- and upper back
A. Sit on the floor with legs in front of you, knees slightly bent, and feet hip-width apart. Lean back slightly, keeping your back straight. Place the middle of the tubing around the soles of both feet so it touches outside edges of your shoes. Hold the tubing’s right handle in your left hand, and vice versa, creating an “X” shape.
B. (Shown) Draw your abs up and in to engage your core. Bend arms and raise to 90 degrees, with palms down and elbows pointed out. Pull the handles away from your feet in a rowing motion until your elbows move slightly behind your ribcage. Keep elbows slightly lower than shoulders throughout.Return to starting position. Do 12 to 15 reps.
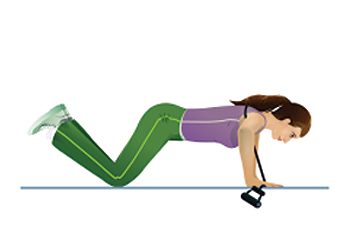
3. Resisted push-up
Works: abs, chest, shoulders and backs of upper arms
A. Place tubing across your back just below your underarms. Get into a push-up position on your knees (or, for more intensity, your toes). Hold each end of the tubing just below the handles; make sure it’s placed where your thumbs meet your hands. Place hands wider than shoulder-width apart.
B. (Shown) Bend arms to 90 degrees, lowering your torso toward the floor in a push-up; keep abs tight and back straight. Look down at the floor, keeping neck straight.
C. Straighten your arms, lifting yourself back up to the starting position against the tubing’s resistance. Complete 12 to 15 reps.
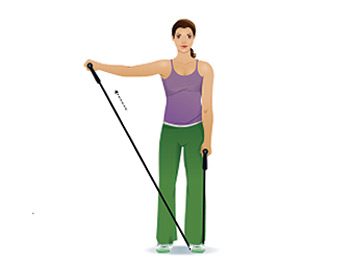
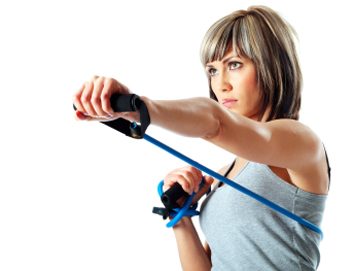
4. Crossover shoulder raise
Works: core and shoulders
A. Stand with feet hip-width apart. With left hand at your side, hold one end of tubing in left hand, and step on tubing with your left foot, holding the other handle with your right hand. Place your right arm at your side so the tubing extends loosely across your body from left foot to right hand.
B. (Shown) Lift right arm away from body until it’s parallel to the floor (keep hand at or slightly lower than shoulder), palm facing ?down, wrist straight and elbow slightly bent.
C. Return to starting position. Do 12 to 15 reps; switch sides.
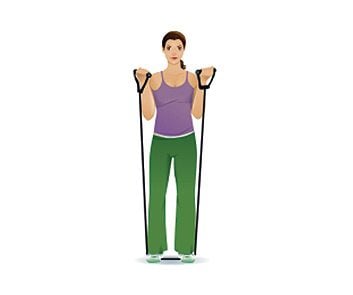
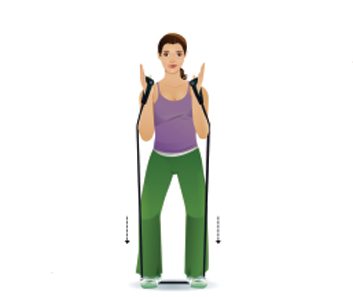
5. Biceps curls
Works: core and front of upper arms
A. Stand on the middle of the tubing, feet hip-width apart with a handle in each hand.
B. (Shown) With arms at your sides, rotate palms to face forward. Curl your arms up, keeping elbows close to your body and wrists straight as you pull the tubing up until palms face your shoulders. Keep abs tight and don’t lean backwards as you pull.
C. Slowly return to starting position; resist letting the tubing pull your arms down-lower with control. Do 12 to 15 reps.
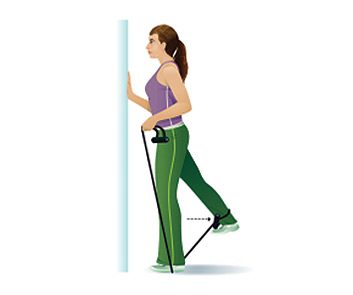
6. Single-leg extensions
Works: core and glutes
A. Make a small loop with the tubing by threading one handle through the other. Place the loop around your left ankle. Stand in front of a wall for balance, and position your right foot slightly in front of your left. Step onto the tubing with your right foot (about 12 inches/30 cm from your left foot) and loosely hold the remaining tubing in your right hand.
B. (Shown) Place your left hand on the wall for balance and tighten your abs. Lift your left foot off the floor, rotating your toes out about 45 degrees. Slowly extend your left leg behind you, keeping it straight. When the tubing is pulled as far as it can go, hold your leg in that position and squeeze your glutes for three seconds.
C. Return to starting position. Do 12 to 15 reps. Switch sides and repeat.
Tubing tips and tricks
Safety first. Check the tubing for little tears before you start-they can cause it to snap in half when pulled. If applicable for an exercise, ensure tubing is secure underfoot by positioning it under the middle ridges in the soles of your fitness shoes. (Don’t use tubing with bare feet.)
Make it harder. You can buy thicker tubing or adapt what you’ve got: The shorter you make the tubing-by holding the rubber part instead of the handles, wrapping tubing loosely around your hands or stepping your feet wider apart-the harder it is to pull.
Cut the slack. For maximum benefits, keep the rubber pulled taut throughout each exercise. Resist letting the tubing go slack at any point-even between reps.
Keep it smooth. Unless your tubing has a nylon cover that protects the rubber from wear and tear, avoid using it on abrasive surfaces like a rough concrete deck or a basement floor.
More great at-home workouts
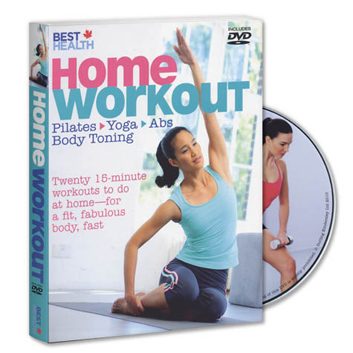
Tired of the gym scene and expensive memberships? Too busy to fit in scheduled classes? Wave good-bye to the hassle of getting to the gym and waiting around for busy gym equipment. Enjoy the same motivating workouts in the comfort and serenity of your home, while you shape, sculpt and stretch your way into a sleeker, fitter body, and rev up your strength and energy levels in no time. Best Health’s Home Workout features wenty inspiring 15-minute workouts include Everyday Pilates, Abs Workout, Better Back, Strengthen and Tone, Gentle Yoga and more.
Available now in the Best Health Store.
Related:
• 3 celebrity workouts you can do at home
• Workout videos: How to do perfect crunches and push-ups
• 10 cheap fitness tools and how to use them
Newsletter Unit