How-to: Canning and preserving
 Updated: Oct. 22, 2015
Canning and preserving are increasing in popularity, and it’s no wonder’there’s no better way to preserve the tastes of summer throughout the whole year. Find out how to get started with canning and preserving
Why we can and preserve
To me, preserving means preserving summer. Each jar of preserves is like a time capsule. When I open it, months later (or perhaps just weeks), I taste terroir and the flavor of long- faded sunshine’in this, a jar of pickled beets is not unlike a bottle of wine.
There is another way that a jar of preserves is like wine: we no longer make it to keep the food from spoiling. We go to the trouble of preparing the food and painstakingly handling the jars so we end up with something delicious. It’s really just another way to cook, to bring out the taste of the produce. I am looking to create something new, whether it’s tomato sauce or sauerkraut. For me, the art of pickling is as much creation as preservation.
The easiest method: Freezing
But before I get into the more esoteric forms of preserving, I should mention a pretty simple one: freezing. This is the best way to take care of berries you want to set aside for winter. I lay them out on a tray and freeze them solid, then store them in freezer bags. Blackberries, blueberries, raspberries, cherries and strawberries freeze very well and have all kinds of uses: we use the berries in crumbles, tarts and sorbets, and the juice in vinaigrettes. The summer flavor comes through pretty much unaffected and brightens any winter meal.
The magic of pickling
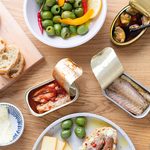
Pickling, on the other hand, creates entirely new tastes: bright, satisfying and complex. Pickled vegetables are a pure delight on cheeseboards, on charcuterie and meat plates and in salads that need a tart component. Pickling baby carrots, for instance, transforms a humble vegetable into a spicy, tart, completely different dish. Cooking is about contrast in flavors and textures; put a pickled carrot on a salad, and you’ve got that contrast in spades. Plus, there is something about pickles that makes you hungry. Most chefs love pickles, and just about any vegetable, from carrots to radishes, can be pickled. Maybe that’s what we’ll do with the big radish delivery next summer!
The pleasure of preserving
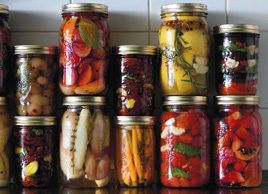
Though preserves need no further arguments to recommend them, there is still one more: they can be a real pleasure to make. Of course, if you’re in a hurry or you have to be somewhere (in other words, if you’re thinking about something else), the process of getting food into jars will seem tedious. But I look at the process as something to enjoy. I suppose there is probably some human instinct that takes pleasure from knowing that the harvest has been tucked away and the larder is full. In any case, taking the time to wash and prepare whole bushels of fruit and vegetables that you’ll eat much later, sterilizing the jars, watching over bubbling pots in a steamy kitchen’ it all adds up to an afternoon to look forward to, particularly if, like me, you keep a bottle of wine open as you go about the work. And there is a unique pleasure that comes from gazing at the brightly coloured jars before you (perhaps reluctantly) store them away.
Canning and preserving tips
Canning and preserving is an art, and there is no way I can make you an expert in a few paragraphs (I’m always learning myself). You’ll pick up tricks and recipes as you go along. Nothing can replace experience, and the only way to get that is to start. But before you begin, here are a few things to keep in mind:
There are many books on preserving’look for recipes that produce small batches, ones you are likely to use.
Always use the proper method, and follow the recipe. Canning is an age-old technique, so look for canning books in their fifth or sixth printing’they have stood the test of time.
Choose fresh produce. We are preserving life here, not trying to bring it back.
Work with sterile equipment. Wash all equipment with soap and water. Sterilize all jars and lids, and don’t forget the tongs, spoons and utensils you will be using.
Store your jars in a cool, dark place‘ not in your kitchen, where you can look admiringly at them and show them off, but in the basement or a closet. (Again, not unlike wine.)
Use common sense. If the preserved food doesn’t look or smell quite right, don’t taste it. Throw it out.
How to get started canning and preserving
Sterilizing jars is the first and most important step. If your jars are not sterile, you won’t preserve anything.
Jars should be free of any chips or cracks. Preserving or canning jars are topped with a glass, plastic or metal lid, and require a rubber seal. Two-piece lids are best for canning, as they vacuum-seal as they cool.
To ensure everything is sterile, wash jars and lids with hot, soapy water. Rinse well and arrange jars and lids, open side up and without touching, on a tray. Set oven to 175°F and heat jars and lids for 25 minutes. Or, boil the jars and lids in a large saucepan, covered with water, for 15 minutes.
Use tongs when handling the hot sterilized jars. Be sure the tongs are sterilized too, by heating the ends in boiling water for a few minutes.
As a rule, hot preserves go into hot jars and cold preserves go into cold jars. All items used in the process of making preserves must be clean. This includes any towels used, and especially your hands.
Some recipes call for a boiling water bath, which is used in canning acidic foods like pickles, tomato sauce and preserves. The boiling water bath eliminates any airborne microorganisms present in the pickling jar while it is being filled and sealed, and forces the air out if the food and canning liquid, creating a vacuum and perfect seal that prevents spoilage. Processing in a boiling water bath for preservation longer than a few weeks is definitely not optional and should be done with care.
Boiling water baths are sold commercially and are quite reasonably priced as a kit. I suggest you use them. Once filled, the jars must fit in the pot on the rack with 1-inch space at the bottom and enough room at the top to cover the jars by two inches. This allows the water to flow freely around the jars. It is important to remember never to tighten the lid before processing or the air will not be able to escape, and the lid won’t seal. Remember it is not you that is making the seal but the jar itself; as the contents of the jar and the air space at the top shrink, the lid is sucked down firmly onto the rim.
Check the seals after one day. A concave lid indicates a proper vacuum. If the lid clicks up and down when pressed, the seal is not complete. You will have to start again.
Excerpted from Earth to Table by Jeff Crump and Bettina Schormann. Copyright © 2009 by Jeff Crump and Bettina Schormann. Photographs Copyright © 2009 by Edward Pond. Excerpted by permission of Random House Canada, a division of Random House of Canada Limited. All rights reserved. No part of this excerpt may be reproduced or reprinted without permission in writing from the publisher.