DIY jewellery organizer
 Updated: Feb. 29, 2012
Get organized by tackling the small things first. This simple DIY jewellery organizer can help’and you can customize it to reflect your own personal style
Source: Best Health Magazine, March/April 2012
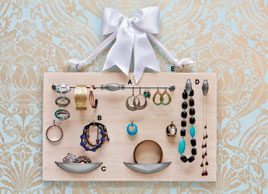
Is your jewellery box overflowing with knotted stuff? Try this storage solution. Basically, we bought furniture hardware’hooks and handles from Lee Valley Tools ‘and attached them to a wooden board. You can hang the board on a wall or simply prop it atop your dresser. We used a long, thin drawer pull for hook earrings and bracelets (A); four L-hooks for bracelets and rings (B); two cupped drawer pulls (installed upside-down) for studs, brooches, bangles and rings (C); and two knob drawer pulls for necklaces (D).
1. Decide on the layout of your display first, by arranging hardware on a piece of newspaper. This helps map out how you want everything to fit and the size of board you’ll need. (The one shown here is 11×18 inches.)
2. Cut wood to size. (Not handy? Ask for help in the lumber department of home-improvement stores.) Then paint or stain the wood as desired, and measure and mark the placement of hardware.
3. With a hand drill, make holes on the back of the piece of wood for the screws that came with your drawer handles and other hardware, then attach the pull to the front. If any screw heads stick out on the back, cover them with a piece of felt (try the stick-on felt pads that you use as floor protectors on furniture legs) so they don’t end up scratching your wall.
4. If you’re going to hang the board on a wall, screw two screw-eyes into the top edge of the board (E), and tie a ribbon on for hanging.