Learn How to Make The Cutest. Holiday. Cookies. Ever
 Updated: Nov. 16, 2022
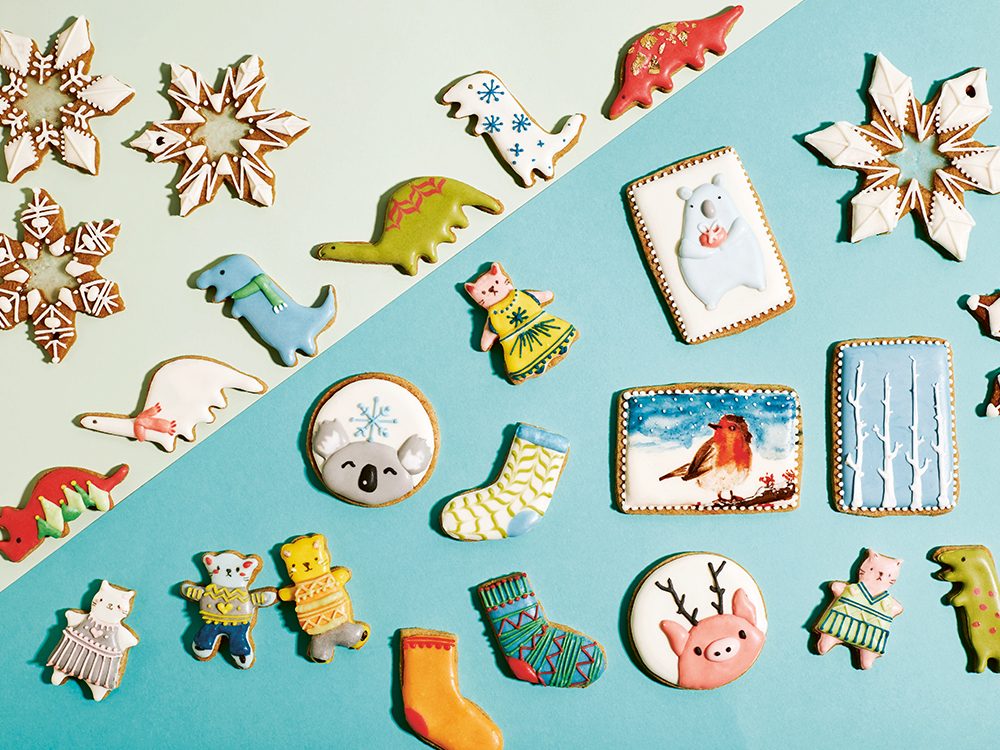
You could stick to your standard holiday baking. Or, you could take a page from Great British Bakeoff star Kim-Joy’s new cookbook and amp up the fun.
Bakers gonna bake (especially in 2020)
When all else fails, bake. That’s more of an Instagram prescription than an ancient proverb, but there’s wisdom in those words. And at this time of year, especially this year, we could all benefit from the soul-soothing balm of sugar and spice. Great British Bakeoff 2018 finalist Kim-Joy provides just that with her new holiday cookbook, Christmas with Kim-Joy: A Festive Collection of Edible Cuteness — a riot of whimsical treats (with no-fail tips and vegan options) that bring big-time fun back into the kitchen.

Shortbread cookies
This recipe can be rolled out thinly and used to cut out your shapes, though you will need to take extra care as this dough has a high fat-to-flour ratio and is therefore a little more delicate. If you are new to working with cookie dough, then use this dough for more simple shapes rather than intricate ones.
You can flavour this however you like – some festive flavour suggestions are orange/lemon zest, ground nutmeg, ground cinnamon, ground ginger, ground cardamom, almond extract or mint extract (pairs well with dark chocolate).
Makes 24 – 30
Ingredients:
- 200g [3⁄4 cup plus 2 Tbsp] salted butter, at room temperature
- 85g [7 Tbsp] caster or granulated sugar
- 200g [11⁄2 cups] plain [all-purpose] flour, plus extra for dusting
- 70g [1⁄4 cup plus 11⁄2 Tbsp] fine semolina
Instructions:
- Line a baking sheet that you can fit in the fridge with baking paper or a silicone mat. Beat the butter and sugar together in a large bowl until smooth and fluffy.
- Add the flour and semolina and mix until just combined. The dough should be slightly sticky, but soft and easy to handle. If necessary, wrap the dough in plastic wrap and chill for 10–15 minutes until firm enough to roll out.
- Turn out onto a well-floured work surface and roll out to about 3mm [1 ∕8in] thick. Use cutters or templates to cut out desired shapes, and transfer to the prepared baking sheet.
- Refrigerate for 15 minutes, while you preheat the oven to 160°C [325°F].
- Bake for 10–15 minutes until just lightly browned at the edges. Leave to cool for 10 minutes on the baking sheet, then gently transfer to a wire rack to finish cooling. These can be left plain or decorated using royal icing (scroll down for a royal icing recipe).
(Related: Try These 3 Kitchen Hacks For Healthier Holiday Baking)
Basic Vegan Shortbread
This shortbread tastes like it is full of butter, thanks to the coconut oil, and people are always surprised that it’s vegan. It has just a hint of sweetness, so it’s perfect for covering with royal icing. If eating these plain, then sprinkle some caster or granulated sugar on top just before baking. You can also add 20–40g [11⁄4 Tbsp–31⁄4 Tbsp] more sugar to the dough, but this will make the shortbread a little more chewy rather than crumbly.
Makes 24 – 30
Ingredients:
- 225g [13⁄4 cups] plain [all-purpose] flour, plus extra for dusting
- 130g [2∕3 cup] organic extra virgin coconut oil (solid and scoopable)
- 40g [31⁄4 Tbsp] caster or granulated sugar
- 30–50ml [2–31⁄2 Tbsp] cold water
Instructions:
- Line a baking sheet that will fit in your fridge with baking paper or a silicone mat. Add the flour to a large bowl, then add the scoopable coconut oil and rub it into the flour using your fingers. Stir in the sugar, then add just enough cold water to bring the dough together into a ball.
- Turn the dough out onto a lightly floured work surface and roll out until it is 3–5mm [ ∕8–1⁄4in] thick. Use cutters or templates to cut out your desired shapes. Transfer the shapes to the prepared baking sheet and chill for 15 minutes while you preheat the oven to 160°C [325°F].
- Bake for 10–15 minutes until just starting to colour at the edges. Leave to cool on the baking sheet for 5 minutes, before transferring to a wire rack to finish cooling.
(Related: The Vegan and Gluten-Free Sugar Cookie This Nutritionist Loves)
Cookie Decorating Tips, Tricks, and Ideas
Royal icing consistency
Different people like to work with different consistencies, but I like to work with what is called a “15-second icing”. This means that after stirring the mixture, the surface will return back to its former smooth state in about 15 seconds. This consistency will work for both outlining AND flooding, so is much easier than making two batches. The definition of ‘15-second icing’ varies for everyone though, as everyone counts differently, so it’s mostly about practising and getting the feel for the correct consistency. My royal icing recipe should get you to roughly the consistency you will need, so hopefully you can work from there! If icing can get back to being smooth in 15 seconds, maybe you can too! Take your time with this.
Easy royal icing recipe
This makes enough for a decent number of cookies
- 40g [11⁄2oz] egg white (substitute with aquafaba for a vegan version)
- 225g [12∕3 cups] icing [confectioners’] sugar
- plus extra egg white (or aquafaba) and icing [confectioners’] sugar to adjust and get the right consistency
Use a stand mixer (or handheld electric whisk) fitted with a balloon whisk attachment to combine the egg white/aquafaba and icing sugar until you get a smooth consistency. Then add tiny amounts of extra egg white (or aquafaba) and/or icing sugar to get the right consistency. Add food dye to colour as desired! That’s it!
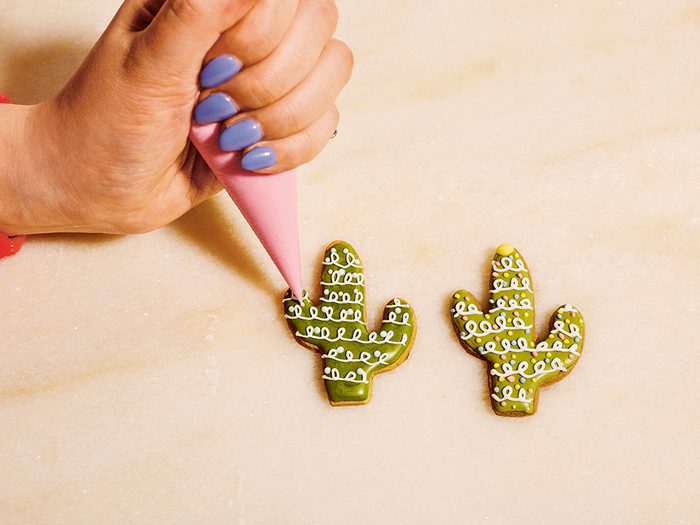
Disposable piping bags
Good disposable piping [pastry] bags are your friends! You want to buy some that don’t have a seam, as this can get in the way when piping. For outlining and for piping intricate details, cut a teeny tiny tip from your piping bag. For flooding, cut a slightly bigger tip (depends on how big an area you are flooding). That’s it. No need for piping nozzles, which make washing up a lot harder! If you ever cut a tip that’s too big, or want to change to a smaller opening, then just pop the piping bag into another piping bag. Cut the tip as desired and continue!
Cookie prep, planning and layering
It helps to draw a guide of where you will pipe the outlines, directly on the cookie. It also helps to know what colours you are going to use before you start, so you can mix them all up and put into piping bags. I don’t always know what colours I will want, so I always leave some white royal icing in a bowl that I can dye later. Just make sure to cover the bowl with plastic wrap, as the surface will crust up quickly.
Sometimes things come to you as you go along. A vague idea is all you need. That’s okay too. Cookie decorating does take some forward planning if you want to do more than one layer, in which case you would wait a few hours for the first layer to dry before working on the second, or third. For instance, you may have a background layer using the wet-on- wet technique to create a sunset, and then after that dries you might want to pipe some mountains on top of that, then add some painted birds. Or you might want to pipe some tiny flower detailing on a dress. The layer underneath would need to be dry before you can do all these things. While your biscuits are drying, set them aside and find something to do (or not do!) to relax.
Outlining
When you first start piping royal icing in a neat line, you might find it tricky. It’s not like dragging a pen across a surface. You need to pipe, lift and ease the line where you need it. Don’t expect to be perfect the first time! Practise and you will get better.
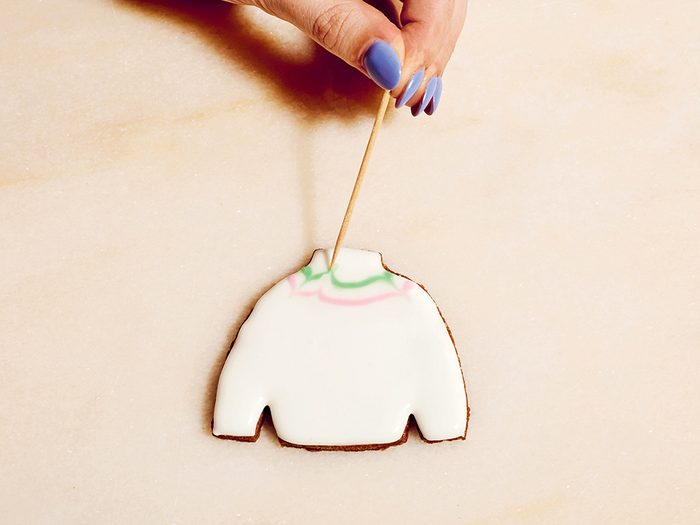
Flooding
No, not the psychological therapy used to overcome phobias – this is much nicer. Once you’ve planned and then outlined your cookie, it’s time to flood. All you are doing is just filling the space inside, and the outline will stop it leaking over. Use a cocktail stick [toothpick] to even it out and get rid of any bubbles before it sets.
Wet on wet
This is when you use two different colours and a toothpick to create some interesting effects. This is useful for polka dots, hearts, flowers and scenes that involve a beautiful gradient of colour (e.g. sunsets, skies, seas, fire).
Painting on royal icing
When your royal icing is completely dry (4–6 hours, but I generally just wait overnight to be sure), you can paint on it using food dyes or lustre dusts mixed with vodka (it evaporates quicker than water). You can also brush on lustre dusts to give depth, and draw on the icing using edible ink pens – anything you can paint or draw, you can do on an iced cookie.
Excerpted from: Christmas with Kim-Joy: A Festive Collection of Edible Cuteness by Kim-Joy, (Quadrille, $32.99), Photography: © Ellis Parrinder.
Newsletter Unit