How to Get Stronger Arms With These 5 Easy Moves

Try these upper body exercises, from push-ups to dumbbell bicep curls, to strengthen your arms and safeguard your health.
Look, strong arms are appealing—whether you’re wearing a tank top or a slick suit, well-muscled shoulders and biceps are sure to turn heads. But you shouldn’t strength-train your arms just for the benefit of looking your best. A well-muscled upper body is key to making everyday life a little easier. Whether you’re tasked with picking up a child or putting away groceries on a high shelf, the muscles of your back, chest, shoulders, biceps, and triceps are constantly working together to help make these daily movements possible.
And when you include upper body strength training as part of your workout routine, you can maintain and gain muscle mass to help make your daily life easier and more efficient.
(Related: 11 Workout Moves You Can Do With Everyday Objects You Have at Home)
What the science says
These strength improvements are particularly important as you enter your 30s and beyond. A review of research from as far back as the 1990s, published in Current Opinion in Clinical Nutrition and Metabolic Care, indicates that most adults start losing muscle mass at the rate of three to eight percent per decade after age 30, with losses increasing even more after age 60. In severe instances, people can lose as much as 50 percent of their muscle mass by their 80s or 90s, according to research published in 2018 in Ageing Research Reviews.
You may think this isn’t a big deal—the elderly don’t need the biceps of a bodybuilder, right? Maybe not. But imagine struggling to carry groceries inside the house, safely lift or lower items from high shelves, or push yourself up off the floor after a fall: Your safety and quality of life would suffer tremendously.
As the authors of the 2018 study on age-related muscle pointed out, the loss of muscle as we age leads to physical frailty and raises your risk of chronic diseases, not to mention potentially shaving years off your life.
How to get stronger arms
So if you want to maintain your independence and functionality well into your golden years, you’d be wise to start safeguarding your strength now. The good news? A well-balanced upper body strength training routine is easy to do at home. However, before you start your workout, here are a few things you should know.
The warm-up
It’s important to warm up before diving into a strength training routine. Set aside five to eight minutes, and warm up in a way that increases your blood flow while also targeting and stretching the muscles you’re going to work on during your routine. For an upper body workout like this one, start by marching or jogging in place for two to three minutes. Then perform a series of sun salutations—aim for five rounds—to get the muscles of your upper body moving.
(Related: How to Warm Up Properly Before A Winter Workout (And What To Do After))
Exercises for stronger arms
These five exercises can be done with little or no equipment (dumbbells and resistance bands are all you need). Together, they’ll target every major muscle group of your upper body.
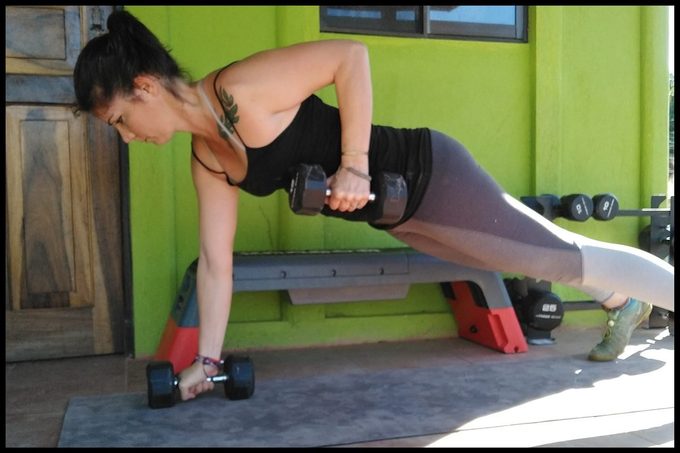
Renegade Row
The renegade row is an excellent first exercise. It targets just about every major muscle group including your back, chest, shoulders, triceps, and core, while specifically working to strengthen the large muscles of the back (the lats, rhomboids, and traps) that are frequently overlooked and neglected. If you don’t have dumbbells, you can do this exercise without weights. Just focus on really contracting the muscles of your back (drawing your shoulder blade in toward your spine) as you lift the working arm.
How to do the Renegade Row
Start in a push-up position, supported on the balls of your feet and your hands, each hand gripping a dumbbell. Make sure your hands are directly under your shoulders and that your body forms a straight line from your heels to the top of your head. Engage your hips, abdominals, chest, and shoulders to maintain good form. Position your feet roughly hip- to shoulder-distance apart to help maintain your balance and proper form throughout the exercise.
Once you’re set, start with your left side. Contract the muscles of your back by squeezing your left shoulder blade in toward your spine, bending your left elbow to draw the dumbbell straight up toward your chest. As you lift the dumbbell, really focus on isolating the left-side muscles of your back to perform the exercise. Avoid the tendency to shift your weight to the right and rotate your left hip and shoulder upward. If you do this, you’re more likely to use your left shoulder and biceps to perform the exercise rather than focusing on your back.
When you’ve drawn the dumbbell to your chest, squeeze and hold the position for a second before slowly reversing the movement and returning the dumbbell to the floor.
- Set guidance: Perform eight to 12 repetitions on the left side before switching arms and performing the exercise on the right side. Complete two to three sets, resting for roughly one to two minutes between sets.
- Weight guidance: Start with dumbbells between 10 and 15 pounds to be sure you can perform the exercise with perfect form. If you can complete 12 repetitions on each side easily, increase the weight. The last one to two reps of each set should be challenging, but not impossible, to complete with perfect form.
Tip: If you can’t perform the exercise with perfect form while balanced on the balls of your feet, drop your knees to the ground and perform the exercise from a modified push-up position.
(Related: The 17 Best Arm Exercises For Women)
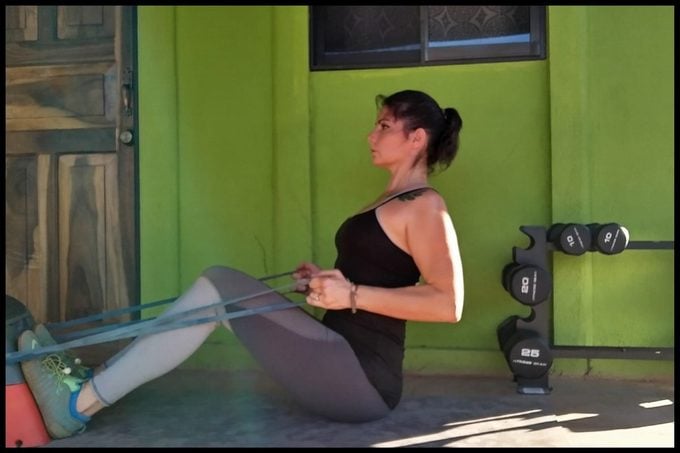
Banded Seated Row
After the renegade row, which hits the back while simultaneously challenging all the muscles of your upper body, the banded seated row is a good way to isolate the major muscle groups of the upper- and mid-back (including the lats, rhomboids, and traps). All you need is a heavy resistance band and a sturdy object to brace your feet against, like a step or a piece of furniture. You can loop the resistance band around the sturdy object or around your feet to create the needed tension.
If you don’t have a resistance band, since you’ve already worked your upper back performing the renegade row, you can skip this exercise and proceed to the push-up.
How to do the Banded Seated Row
Sit on the floor with your knees slightly bent. Brace the balls of your feet against a sturdy object and wrap a resistance band around the back of the sturdy object or around the balls of your feet. Grasp the ends of the resistance band in each hand. If the band feels loose, “choke up” your grip, grasping the band closer to your knees or feet so it feels taut.
Engage your abdominals and core, and roll your shoulders back, making sure your posture is straight and “tall,” so your shoulders and hips are aligned and you could draw a straight line from your ears to hips. Lean back slightly so your arms straighten and become aligned with the band, causing the band to tighten slightly. From here, engage your upper back and draw your shoulder blades in toward your spine, bending your elbows and pulling your hands to your torso, creating more resistance in the band.
When your hands are at your torso, hold the position for a second before slowly reversing the movement to straighten your arms.
- Set guidance: Perform two to three sets of eight to 12 repetitions.
- Weight guidance: Choose a medium or heavy resistance band. The muscles of your upper back are large and strong and are capable of working with more resistance.
(Related: 5 Ways to Get the Most Out of A Plank)
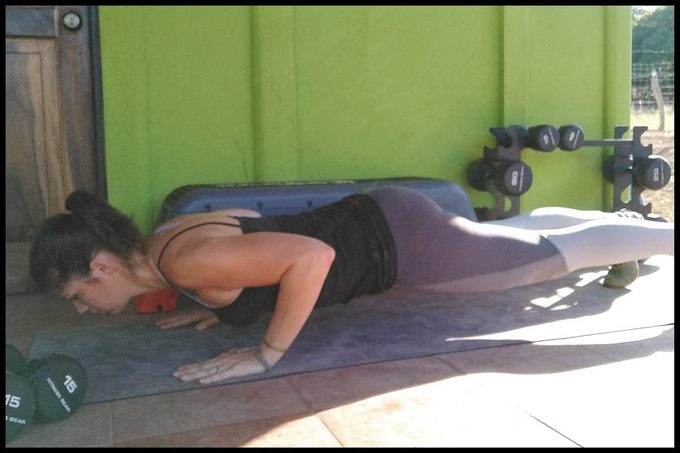
Push-up
The basic push-up is an excellent way to target the chest, triceps, and shoulders, while also working on core strength and stability.
How to do the Push-up
Start in a standard push-up position with your body forming a straight line from heels to head while balanced on the balls of your feet and your palms. Make sure your palms are aligned directly under your shoulders, but slightly wider than shoulder-width apart. The placement of your feet is up to you. If your feet are closer together, the exercise will be more challenging; if they’re farther apart, the exercise will be slightly easier to perform.
Once set, engage your core, hips, and shoulders, then slowly bend your elbows, lowering your chest toward the floor in a slow and controlled fashion. Your elbows should bend backward—not laterally out to the sides—at an angle roughly 45-degrees from your torso. When your chest is about two to three inches from the floor, reverse the movement, engaging your chest and triceps to push yourself back to the starting position as you extend your elbows.
- Set guidance: Perform two to three sets of eight to 12 repetitions. If you find that 12 repetitions are easy to perform, increase your repetitions to 15 or 20.
Tip: If a standard push-up is too difficult, perform the exercise on an incline (with your hands on a chair or bench). Or perform the exercise in a modified position with your knees on the floor.
(Related: How to Do Push-Ups Properly)
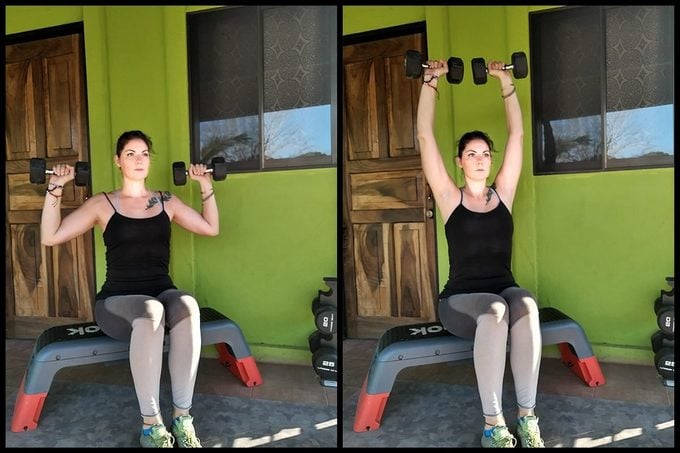
Dumbbell Shoulder Press
You’ve already put your shoulders to work stabilizing your body during the renegade row and offering an assist as you performed your push-ups. But the dumbbell shoulder press is a great way to really hit the larger deltoid muscles. If you don’t have dumbbells, you can use a resistance band, instead. Just brace it under your thighs (if seated) or your feet (if standing) to perform the movement.
You can perform the dumbbell shoulder press from a seated or standing position. The seated position will be slightly easier, as it doesn’t require full-body stabilization, so you’ll likely be able to use slightly heavier weights. The fundamentals of both variations are the same. Just remember, if you perform the exercise standing up, bend your knees slightly and tuck your hips under to help engage the core and protect your back, preventing unwanted forward-backward swaying.
How to do the Dumbbell Shoulder Press
To perform the exercise, hold a dumbbell in each hand. Bend your elbows and position your hands at your shoulders, your palms facing forward, your elbows touching your sides. Check your posture—brace your abdominals and core and roll your shoulders back. Make sure your ears, shoulders, and hips are aligned.
If you’re standing, the alignment should extend to your knees and your ankles as well.
From this position, use the muscles of your shoulders to press the dumbbells straight up overhead, extending your elbows. The dumbbells should almost touch at the top of the movement. Hold for a second, then carefully and steadily lower the dumbbells back to the starting position.
- Set guidance: Perform two to three sets of eight to 12 repetitions.
- Weight guidance: Start with five- to 12-pound weights. If you can easily perform 12 repetitions, continue increasing the level of resistance. You want the last two to three reps of each set to be challenging, but not impossible, to perform with good form.
(Related: 4 Strength Training Tips Every Woman Needs to Know)
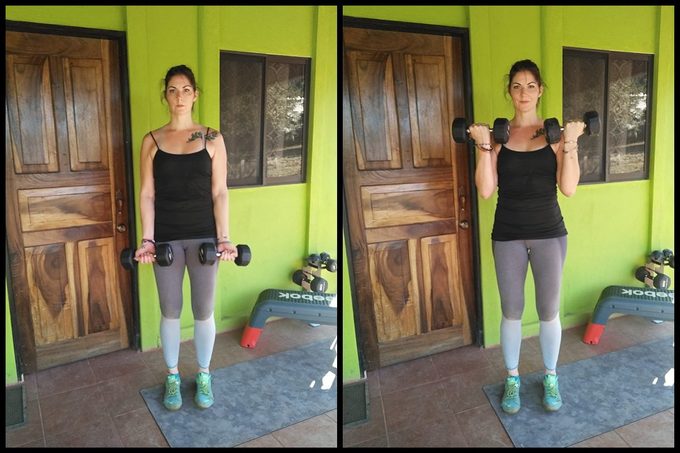
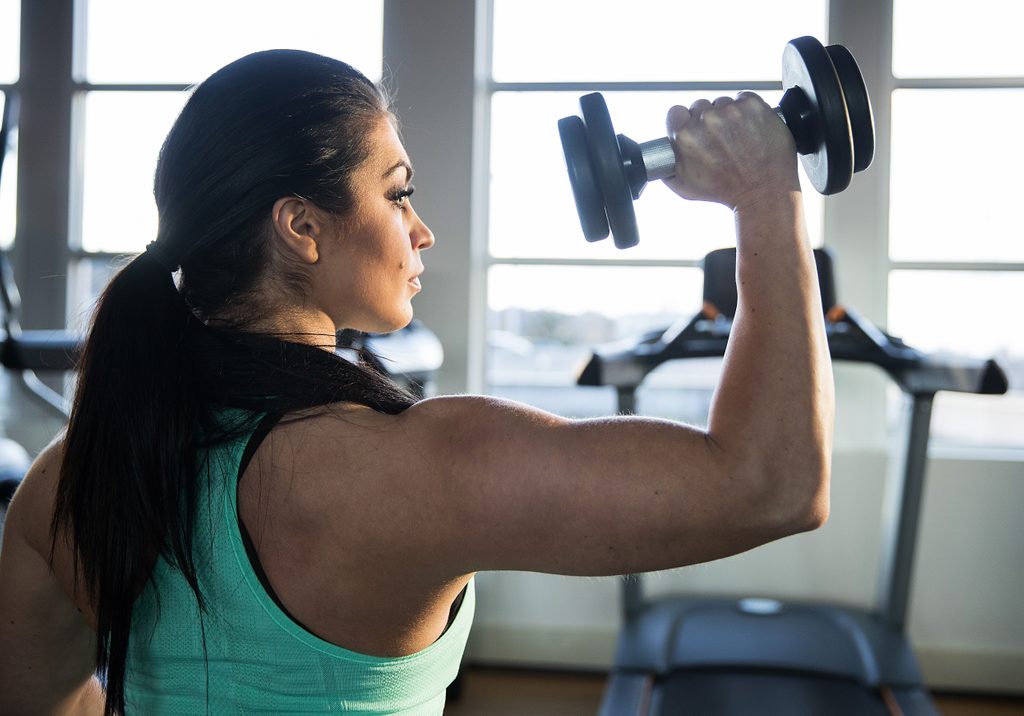
Dumbbell Biceps Curl
The biceps—the large muscle at the front of the upper arm—are some of the smallest major muscles of the upper body. Saving them for last is a good way to isolate them after keeping them warm with other compound movements like rows and shoulder press.
How to do the Dumbbell Biceps Curl
Stand tall with your feet roughly hip-distance apart, holding a dumbbell in each hand. Bend your knees slightly and tuck your hips under as you engage your core and check your posture. Make sure your heels, hips, shoulders, and ears form a straight line.
Position your hands so your palms face forward and the backs of your hands are at the front of your thighs with your arms fully extended. Brace your core and use your biceps to pull the dumbbells all the way up to your shoulders as you bend your elbows. Just make sure you keep your elbows at your sides to isolate your biceps.
Once the dumbbells are at your shoulders, slowly reverse the movement and return the dumbbells to the starting position in a controlled manner.
- Set guidance: Perform two to three sets of eight to 12 reps.
- Weight guidance: Start with five- to 12-pound weights. If you can easily perform 12 repetitions, continue increasing the level of resistance. You want the last two to three reps of each set to be challenging, but not impossible, to perform with good form.
Tip: Avoid rocking your torso forward or backward to swing the weights up with momentum. If you find you can’t lift the weight up without this added momentum, reduce the weight you’re lifting or reduce the number of reps you’re performing.